为什么要做e2e
前端逻辑越来越复杂,仅单测或接口测试已经无法模拟出用户端的实际操作,无法覆盖到前后端逻辑结合后的业务场景:
// 公用页面 common.html
axios.post('/api', {
  serviceCode: this.$route.query.serviceCode || this.confMap.serviceCode
})

// 第一次,小明接需求,接了图文问诊,实现方式:通过生态后台配置了 confMap.serviceCode,值为 tuwen
// 第二次,小红接需求,接了电话问诊,实现方式:从入口页面携带query common.html?serviceCode=dianhua

单看代码很难发现问题,且对于后端来说也不是错误的参数。但在业务上来说,的的确确会阻塞流程
E2E(End to End)测试
又叫端对端测试,是一种从头到尾测试整个软件产品,以确保应用程序流按预期运行的技术。它定义了产品的系统依赖关系,并确保所有集成部件按预期协同工作。
软件测试
- 以测试过程中执行状态分类:静态测试和动态测试
- 以具体实现算法细节和系统内部结构的相关情况可分为:黑盒测试、白盒测试和灰盒测试
- 从程序执行的方式来分类,可分为人工测试和自动化测试
测试框架横向对比
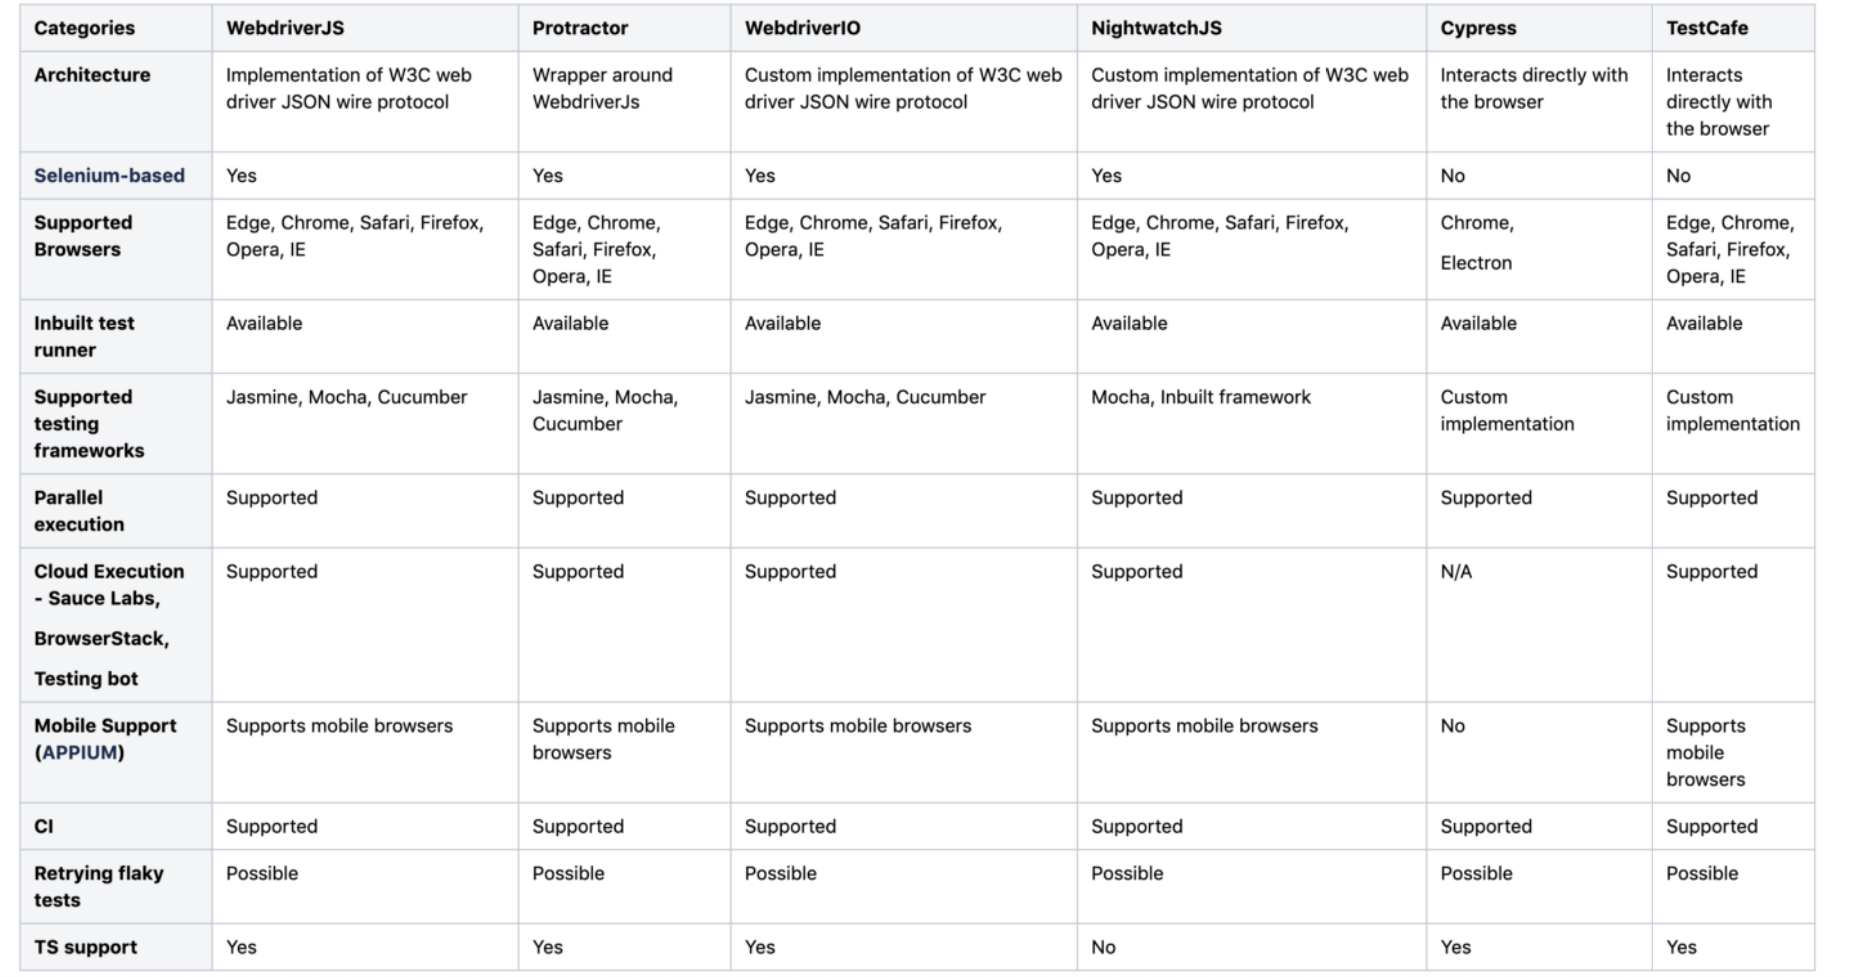
- WebdriverJS、Protractor、WebdriverIO、NightwatchJS、Cypress、TestCafe
- Playwright(ms)、Puppeteer(google)
testcafe小试牛刀
- 安装
npm i testcafe - 编写测试用例代码
demo.js: - 执行用例:
npx testcafe chrome demo.js
  // demo.js
  /*
    1. 打开一个在线的信息编码工具网站
    2. 验证工具解码是否正确: 即输出 %E5%BE%AE%E5%8C%BB 解码后,是否是'微医'
   */
  import { Selector, t } from 'testcafe'

  fixture `我是demo`
    .page `https://www.baidufe.com/fehelper/index/index.html`

  test('我是demo', async (t) => {
    await t
      .click(Selector('.section-container .title').withText('信息编码转换').parent().find('a'))
      .click(Selector('.x-opts .radio').withText('URL解码').find('input'))
      .typeText('#srcText', '%E5%BE%AE%E5%8C%BB')
      .click('#btnCodeChange')
      t.expect(Selector('#rstCode').value).eql('微医', '转换出错')
  })
配置测试进程运行时的环境信息
js实例配置
- 创建
index.js: - 运行:
node index.js
// index.js
const createTestCafe = require('testcafe');
(async function () {
  const testcafe = await createTestCafe('localhost', 1337, 1338)
  try {
    const runner = testcafe.createRunner()

    const failedCount = await runner
      .src(['./core/testcase/demo.js'])
      // .browsers(['edge:emulation:device=iphone X'])
      .browsers(['edge:emulation:width=1366;height=768'])
      // 错误自动截图
      .screenshots({
          path: './screenshorts/',
          takeOnFails: true,
          pathPattern: '${DATE}_${TIME}/test-${TEST_INDEX}/${USERAGENT}/${FILE_INDEX}.png'
      })
      // .reporter(['spec', {
      //     name: 'json',
      //     output: 'reports/report.json'
      // }])
      .reporter('cucumber-json')
      .run({
        skipJsErrors: true, // 页面js错误是否忽略
        quarantineMode: true, // 隔离模式,可以理解为失败重跑
        selectorTimeout: 15000, // 设置页面元素查找超时时间,智能等待
        assertionTimeout: 7000, // 设置断言超时时间
        pageLoadTimeout: 30000, // 设置页面加载超时时间
        debugOnFail: !true, // 失败开启调试模式 脚本编写建议开启
        speed: 1 // 执行速度0.01 - 1
      })

    console.log('Tests failed: ' + failedCount)
  }
  finally {
    await testcafe.close()
  }
})()
其他方式
- 根目录创建配置文件
.testcaferc.json(优先级高于js(runner实例)文件) - 指令方式配置
npx testcafe remote demo.js --qr-code --selector-timeout 50000
如何进行异常分析
错误流程截图
通过配置screenshots,可以对测试的流程进行截图(支持headless)
  runner
    .screenshots({
        path: 'record/screenshorts',
        takeOnFails: true,
        pathPattern: '${DATE}_${TIME}/test-${TEST_INDEX}/${USERAGENT}/${FILE_INDEX}.png'
    })
测试流程录屏
- 依赖本地FFmpeg插件(testcafe提供)
  runner
    .video('record/videos')
过分依赖环境
- 通过注入rrweb.js,将rrweb生成的数据通过接口发送到后端。最终通过还原数据实现录像的功能
  runner
    .clientScripts('scripts/rrweb-record.min.js', 'scripts/index.js')
可以通过testcafe提供的外挂js的方式实现录屏,且rrweb可以将页面的接口请求记录下来(还可以查看dom信息)
测试报告分析
默认是标准的测试报告 spec,不太好看。
testcafe支持安装第三方插件进行报告生成 npm i testcafe-reporter-cucumber-json multiple-cucumber-html-reporter
- 配置测试报告插件:
runner
  .reporter('cucumber-json')
- 将测试报告生成页面:
report-generator.js:const report = require('multiple-cucumber-html-reporter');
const path = require('path');
const projectName = path.basename(__dirname);
const projectVersion = process.env.npm_package_version;
const reportGenerationTime = new Date().toISOString();
report.generate({
reportName: 'TestCafé Report',
jsonDir: 'cucumber-json-reports',
reportPath: 'cucumber-json-reports/html',
openReportInBrowser: !true,
disableLog: true,
displayDuration: true,
displayReportTime: true,
durationInMS: true,
customData: {
title: 'Run info',
data: [
{ label: 'Project', value: `${projectName}` },
{ label: 'Release', value: `${projectVersion}` },
{ label: 'Report Generation Time', value: `${reportGenerationTime}` },
],
},
});
还能做什么
- 测试实例浏览器窗口注入js实现错误上报、录屏等功能(如rrweb.js实现dom录屏)
- 接口拦截器(监听页面运行中接口报错)
- 电商自动下单、使用”测试“代替人工重复性的点点点操作(验证码?)
缺点
- 编写成本,需要亿点点的前端基础
- 维护成本,页面上一个文本的改动可能就涉及测试用例代码的重新发版
个人思路
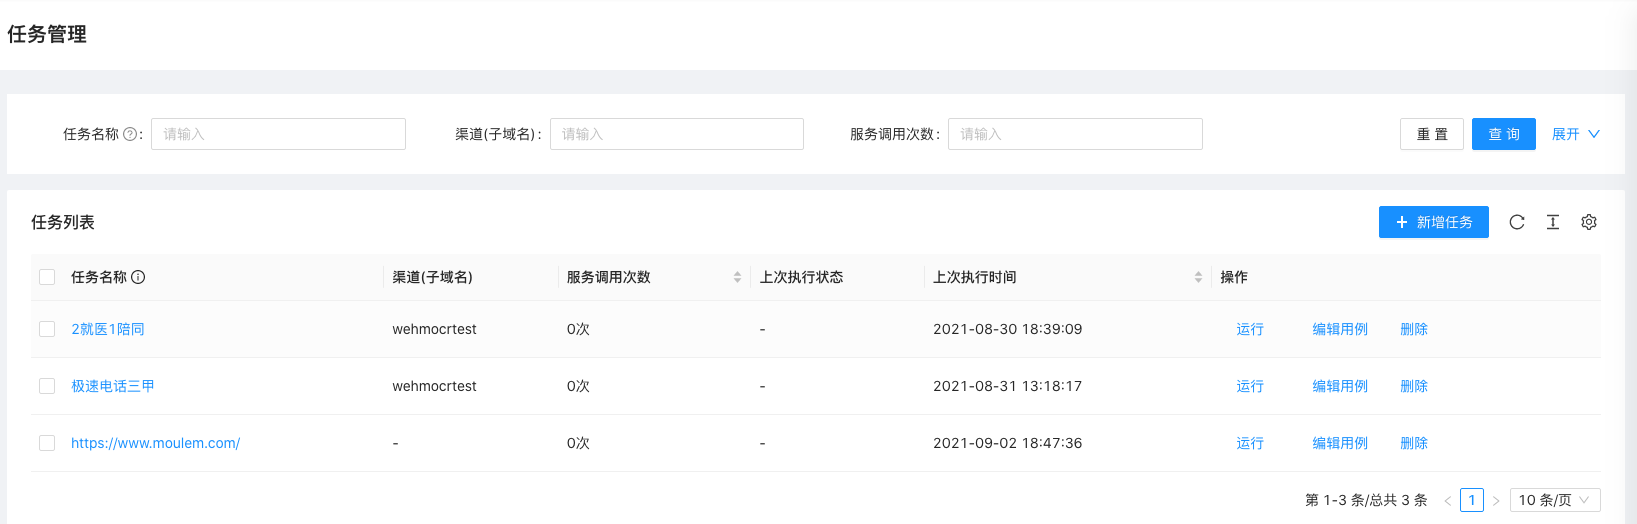
- 使用json编写。解析器,能够将JSON解析为testcafe识别的代码,并将其执行
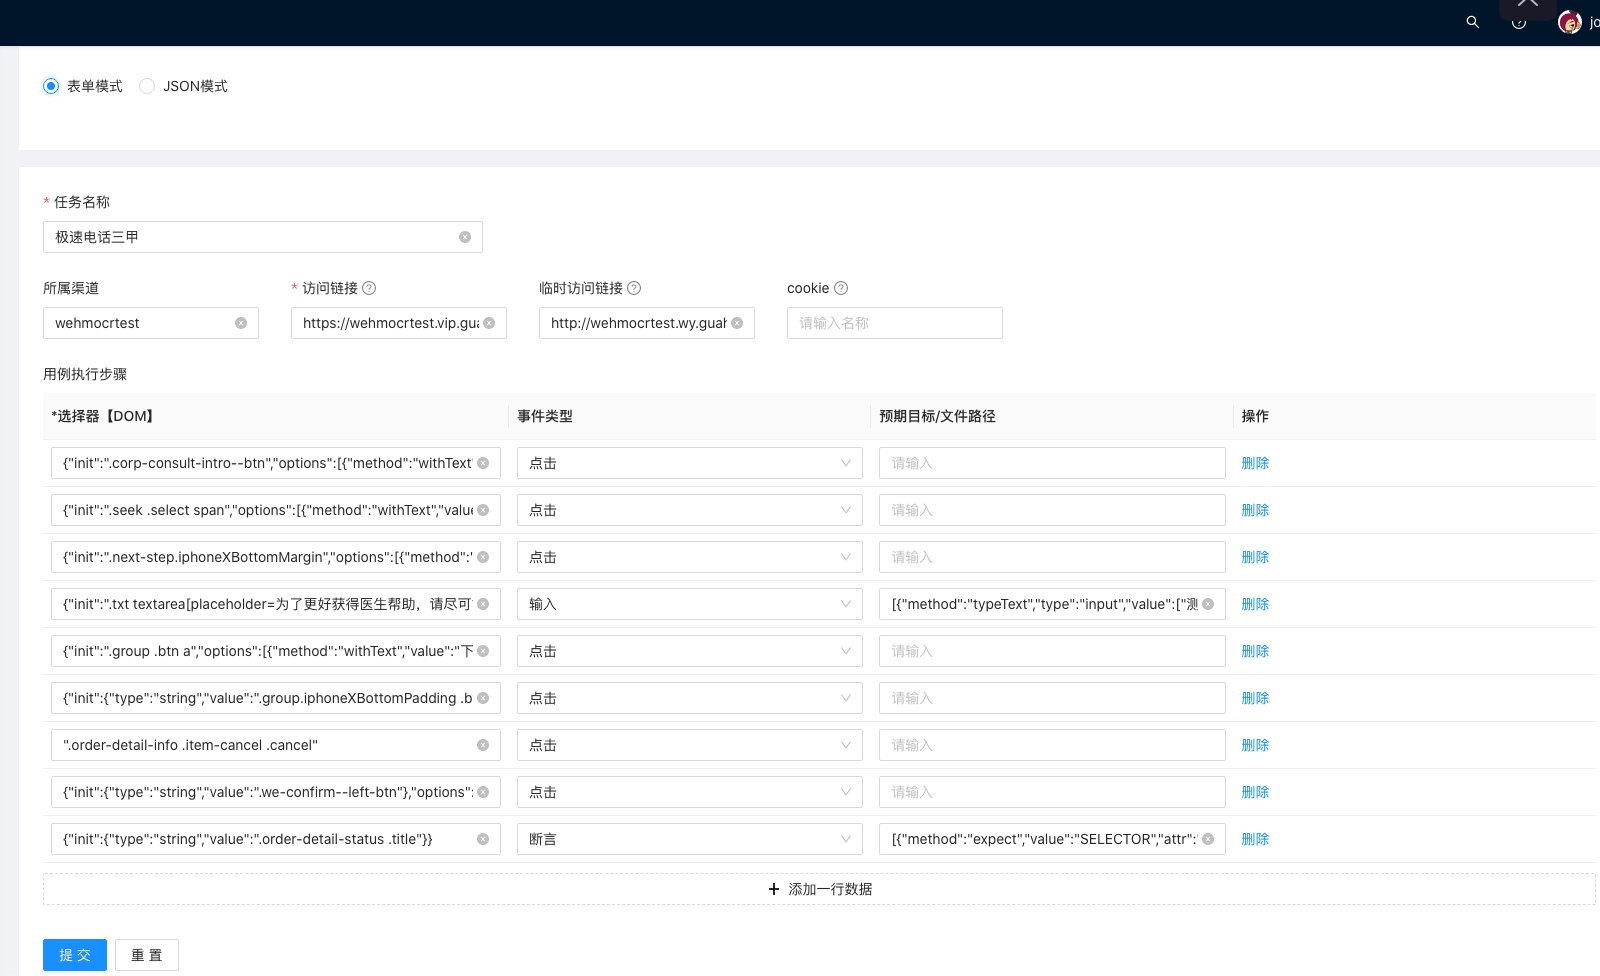
- 通过web后台控制测试。后台页面与本地后端服务进行通信,调用testcafe进程运行测试任务
- 自动生成json。浏览器插件,点击页面,监听dom元素,生成json数据